
Side note: despite having finalized these rules months ago - and routinely playing them – my progress on such things as diagrams and ‘proper’ draft writing occurs at a glacier’s pace. I always find more satisfying to actually play a wargame rather than writing about it; I’m afraid I’m not much of a blogger. Anyway, I’ll keep putting my finalized designs here for future reference.
In the
previous post, I have broadly outlined the size of both the playing map and the
playing pieces of my OHW Marengo scenario. It’s time to find how to make those
blocks move around the battlefield in a way which makes (at least some) historical
sense!
Starting from
the map (again)
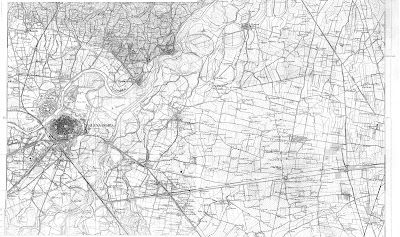
The first
thing I did was to survey the square section of the historical map I decided to
use for my OHW scenario and take notes about which types of terrain I needed to
model the overall course of the battle:

Map 1: OHW-style square battlefield.
As I
mentioned in the previous post, some of the features are a bit puzzling, so
I’ve referred to a later map (approximately from the 1870s) to understand e.g.
what exactly happens to the southern portion of the Fontanone. Unfortunately,
this wasn’t very successful as the landscape seemed to change quite a lot
during those 70-ish years, with the Fontanone being replaced by two different
streams called Rio Boggio and Rio Ressia… In fact, I suspect that “Fontanone” (big
fountain/canal) might just be a funny name for any small water course in the
local dialect, just as “montagnone” (big mountain) might ironically denote any
ditch higher than 10m. At least, the later map was useful in making me
understand that all those straight lines in the SW corner of the map aren’t most
probably roads, but irrigation ditches.
Map 2: Istituto Geografico Militare Survey Map (apparently from the 1870’s?)
It became
immediately apparent that I needed a lot more terrain types w.r.t. OHW’s RAW.
Based on the previous two maps, I’ve outlined these terrain types on the map
itself:

Map 3 – Terrain types:
Blue – Watercourses (thick: major, thin: minor)
Dark Green – Woods
Light Green – Marsh/Muddy
Yellow – Ploughed Fields
Yellow with Green outline – “Alberata e Seminativo” fields (more on that below)
Red – Conurbations & smaller Built-Up-Areas, e.g. walled farms
Contour lines (uncolored) – Hills
Dots (uncolored) – Orchards
Most remaining lines – Road network (paved, dirt, or tree-lined avenues)
Just
looking at the annotated map makes some aspects of the battle much clearer. For
example, Marengo was just one of the many BUAs in the area, but it had the only
solid bridge in the whole area across an almost uninterrupted series of creeks
and marshes. Austrian artillery and cavalry just needed to clear that chokepoint – no wonder it became the crux of
the battle. If you just treat anything east of the Bormida as clear terrain (as
some rulesets do) then the historical Austrian course of action make no sense
at all. In fact, Austrian troops emerging from the bridgehead just had four
broad choiches:
(1) press
forward along the road through Pietrabuona and Marengo: obvious choice but one
with several drawbacks (COA historically followed by e.g. Kaim’s and Morzin’s troops)
(2) take the road to Castelceriolo: potentially decisive but very slow (COA historically followed by Ott, Schellenberg, Vogelsang etc)
(3) try to cross the Fontanone near La Barbotta (attempted e.g. by Elsnitz and
Frimont)
(4) try to follow the eastern bank of the Bormida then cross the Fontanone at
the ford (no ‘solid’ bridge there!) near La Stortigliona (disastrously
attempted by O’Reilly)
…anything
else seems highly unlikely. This means that all the advantage in cavalry and
artillery by the Austrians is severely hampered by the terrain and that the French
can concentrate their defense on a few well-chosen chokepoints. Moreover, the
mere size of the Austrian army implies that they cannot choose the same COA for
all troops: there’s just no space to do that. They need to split their force
across the four possible approaches.
So far so
good! But I needed to actually translate all of the above into OHW rules. This
is what I’ve done:
Amendments to
movement rules
First of
all, I didn’t change OHW’s RAW movement rates, because they don’t seem too
different to what everyone else is doing in other rulesets. Movement rates are
quite tricky because they’re unavoidably intertwined with the modeled
timescale: how far a formed infantry battalion can march in a turn depends on
how much time a turn represents, of course. Moreover, even if I rigidly defined
the length of a turn, I could only compute movement distances for formations
moving in straight lines for the whole time – thus not taking into account
formation changes, pauses, bursts of hyperactivity in response to enemy actions,
etc etc.
OHW
movement rates just imply that cavalry can on average move twice as fast as
formed infantry, and I’m content with that for two reasons. First, it’s one of
the parameters that Mr. Thomas took into account when fine-tuning OHW’s
scenarios, so messing with that would impair the compatibility of my amendments
with the scenarios as written – something I’d like to avoid. Second, I’ll be
able to retroactively make movement rates as ‘realistic’ as possible by varying
turn length and finding which one produces the most historical results. For
this reason, I’ll leave the exact duration of one turn undefined for the
moment. All in all, the movement allowances I’m using are the following:
|
Formation |
Movement allowance per turn |
|
Line Infantry |
6” (250 m) |
|
Skirmishing infantry |
9” (375 m) |
|
Heavy Cavalry |
12” (500 m) |
|
Artillery Battery (limbered) |
6” (250 m) |
|
Artillery Battery (unlimbered) |
0” (0 m) |
|
Shooting Unit |
Effective range |
|
Musketry |
3” (125 m) |
|
Artillery (direct) |
24” (1000 m) |
|
Artillery (bounce) |
36” (1500 m) |
Interpenetration
Line infantry
and cavalry can pass through artillery if they face the same direction as artillery
AND artillery doesn't move this turn. Skirmishers can pass and be passed
through anyone, at any angle (as per the RAW).
Columns of route (road movement bonus)
Road movement
bonus is 6” (instead of 3” as in the RAW) for all units. However, to qualify
for the bonus units must spend their entire move (including the extra 6”) on
the road network, and they must pivot in a specific way at the end of the move,
simulating the adoption of a non-combat formation: they must end their move
with both of their flanks touching the road (see Figure 1), i.e. as if moving ‘sideways’ so to
speak. Of course, only one unit can occupy a given length of road at the same
time. Following this rule, units in column of route can get a substantial
movement bonus but will arrive at their destination in a suboptimal combat
formation (since they’ll need one further turn to attack anything in the
general direction of their movement, or to avoid flank charges/enfilade extra
hits).

Figure 1 – Columns of route and road movement. Left: The cavalry unit (below) has a normal movement allowance of 12”, so it can just move this far without restrictions (orchards and ‘normal’ fields are clear terrain, see below). The three infantry regiments only move 6”, but they decide to use the extra +6” road movement bonus to keep up with cavalry. To qualify for road movement bonus they must end their move with both flanks on the road; if they do so, their centre point can move 12”. Right: position after moving. The cavalry squadrons could move 12” without pivoting and are ready to charge any enemy appearing on their West; the three infantry regiments are instead in column of route, stretched out to around 750m along the road and not in a position to immediately project maximum offensive or defensive potential to the west.
Cavalry charges
Cavalry
must have LOS to their target at the start of their move. Due to this, charges
cannot be performed e.g. when
interpenetrating an intervening friendly unit, or towards unseen enemies beyond
a ridge. Cavalry can still charge when negotiating a bottleneck and/or when
receiving a road movement bonus; in this case however they end their charge
‘sideways’, with their short flanks contacting the opponent (again, simulating suboptimal
combat formations). Such hasty/constrained attacks only inflict 50% hits on the
target.

Figure 2 – Cavalry charges. Left: both Futak 1° and
Futak 4° dragoons are 18” away (I always measure distances via front centre
points) from enemy formed infantry. Right: Futak 4° decides to use their
standard 12” movement allowance to get closer to Chambarlhac’s men with all
squadrons in line. Instead, Futak 1° are on a road and decide to stretch out
into a hasty charge adding a +6” bonus to their 12” move. They can charge
Chambarlhac 24°, but squadrons reach the enemy lines in a more piecemeal
fashion: under my amendments, this is abstractly represented by putting the
block ‘sideways’. This hasted charge will inflict half the usual amount of
hits.
Rivers, Creeks and Streams
Major
rivers such as the Bormida are impassable and can only be traversed at a ford
or fixed/pontoon bridge (see below). Lesser but relevant water courses such as the Fontanone creek can be crossed by
infantry (both line and light) at any position, but crossing is hindered (i.e.
must happen ‘sideways’, see below). Lesser water courses are impassable to artillery
and cavalry; but while cavalry can still cross these at fords, artillery needs
‘real’ solid bridges such the one at the Marengo fortified farm. Infantry units
(both line and light flavours) can cross lesser water courses at any point. Infantry
units in contact with rivers of all types receive cover from attacks coming
from the opposite bank (both shooting and charges – provided the latter are
possible of course).
Bridges, fords, pontoons, bottlenecks and
traffic jams
All units
can only move across major bridges as part of a road move (see Figure 3a).
Units crossing at fords and pontoon/minor bridges must in addition end their
moves with their central point *on* the bridge/ford (Figure 3b - in practice,
only one unit will be able to cross per turn). If the crossing point is not
connected to a road then the crossing unit must also end with both its flanks
on a line perpendicular to the edge of the just-negotiated obstacle (Figure 3c).

Figure 3 – Crossing at fords, bridges, etc. (a) Major bridge crossing. The Bormida is impassable along its whole course to all troops; the tête-de-pont at Alessandria is across a major bridge. All units must cross the bridge by normal road movement (see Fig. 1 above). (b) Road movement with no bridge. Elsnitz 3° Dragoons start their move on a road, so they could gallop up to 12+6=18” if they remained in column of route. However, they reach a ford much sooner. They must thus stop with their centre point on the ford, still in column. (c) Creek crossing with no road or bridge. Minor streams/creeks can be traversed at any point along their course by infantry, but units must stop with their centre point on the obstacle and forming column of route ‘as if’ on a perpendicular road.
Major conurbations (“Towns”) and smaller
Built-Up-Areas (BUAs)
All unit
types can occupy (i.e. end their move inside) towns; but only infantry can
occupy BUAs. Units in towns and BUAs count all their sides as “front”; they can
thus shoot 360° and cannot be charged/shot “in the flank/rear”. In addition to
this, line and light infantry only receive 50% hits when attacked. Artillery
cannot fire while in a town. Cavalry can only charge units inside towns and
BUAs as if it was using road movement (regardless of whether they’re actually
on a road or not at the start of their move); that is, they must charge
“sideways” (inflicting 50% hits, see above).
Marshes / muddy ground
Artillery
cannot enter these at all, and their cannonballs won’t “bounce” (details in the
next instalment). Cavalry can move through it by suffering a weak (1d6-2)
attack each turn due to the resulting chaos.
Alberata e Seminativo
Old‑fashioned
vineyards as very, very probably in use near Marengo at that time (see also this
excellent post). My late father used to work for the Italian ministry of
agriculture, and I remember him telling me how modern/mechanized techniques
really changed the way people used to grow vines. I remember how he explicitly
talked about ‘alberata e seminativo’ (which is a modern agronomy name for an
ancient practice) as an example. In old times (but in some remote places or in
small family farms, probably up to the first half of XX century), vines were
not usually assigned their own piece of turf, but were grown on fruit trees
planted in straight rows around ploughed fields. Irrigation ditches were dug
between adjoining fields. In a way, you can think of ‘alberata e seminativo’
vineyards as a (less extreme) version of bocage.
So my
proposal for representing them at Marengo is to make them impassable to both artillery
and cavalry. I know this sounds harsh, but I think it really makes sense when
considering the historical course of the battle, and specifically the very
limited impact all those Austrian cavalrymen made even after negotiating the
main chokepoints.
Woods and hills
As per the
RAW.
Ploughed fields and orchards
I’m
inclined to treat these as clear terrain for no particular reason other than
the battlefield seems already quite constrained as it is now. I’ll change this
later if needed…
Design Notes
The only
‘exotic’ mechanism introduced in these amendment is the funky ‘sideways’
movement used to represent non-combat formations. I didn’t want to introduce
any new marker/status/etc in addition to the hit track already used by OHW, and
I think this works in a very abstract way. Basically, both columns of route and
disordered/constrained formations are represented by turning the unit sideways
with respect to the direction traveled. It’s a bit difficult to get
tournament-tight wording on this, but I hope the schemes above convey the basic
idea. I think it’s also a very simple way to model road traffic jams and units
stretching out when in road column. Combined with the new artillery rules (see
next post!) and cavalry charges, this also models the vulnerability of these
formations to shot, as well their less-than-ideal combat efficacy, for almost
no extra rules overhead.
Some of the
various terrain-related amendments will probably have marginal impact at
Marengo, but I feel they make sense. For example, defending/attacking towns and
chateaux with dragoons and the like
becomes possible, although far from ideal; this might perhaps come into play
around Castelceriolo.
On the
other hand, I feel some of the terrain amendments are crucial to really bring
the Marengo map to life for OHW play. The most prominent example of this is
probably that now ‘real’ bridges become more important than temporary/non-obvious
crossing points (making that Marengo bridge all-important) and that creeks can be
important defensive features (thus making defending the Fontanone a viable
strategy).
In the next
post, I’ll detail the combat-related amendments. In the meanwhile, take all of
the above strictly just as my 2 pennies – pardon, Marengos…

Why not just represent march columns as any unit greater than X" away from an enemy unit gets to move faster. This way you can stay at the "Corps Commander" level and let the unit commanders control what "formation" the unit is in. Gets rid of a whole slew of exception rules.
ReplyDeleteYes, that would definitely streamline everything, but here I really wanted to model the interplay of different troop types with Marengo's peculiar battlefield, which I consider the most important factor in shaping the battle. My goal for this series of posts was to understand whether you can use a ruleset as simple as OHW and still model the overall course of an historical battle, with real time/space measurements, historical OOBs, etc etc... And surprisingly, I think that it's possible. I don't think I'll ever study games with 100+ pages of rules anymore :-D
Delete